An IVR system directs phone calls to the appropriate departments or agents. Callers interact by pressing numbers on their phone to navigate options.
1. Accessing IVR
Improve caller experience with personalised greetings and menu options with the help of IVR.
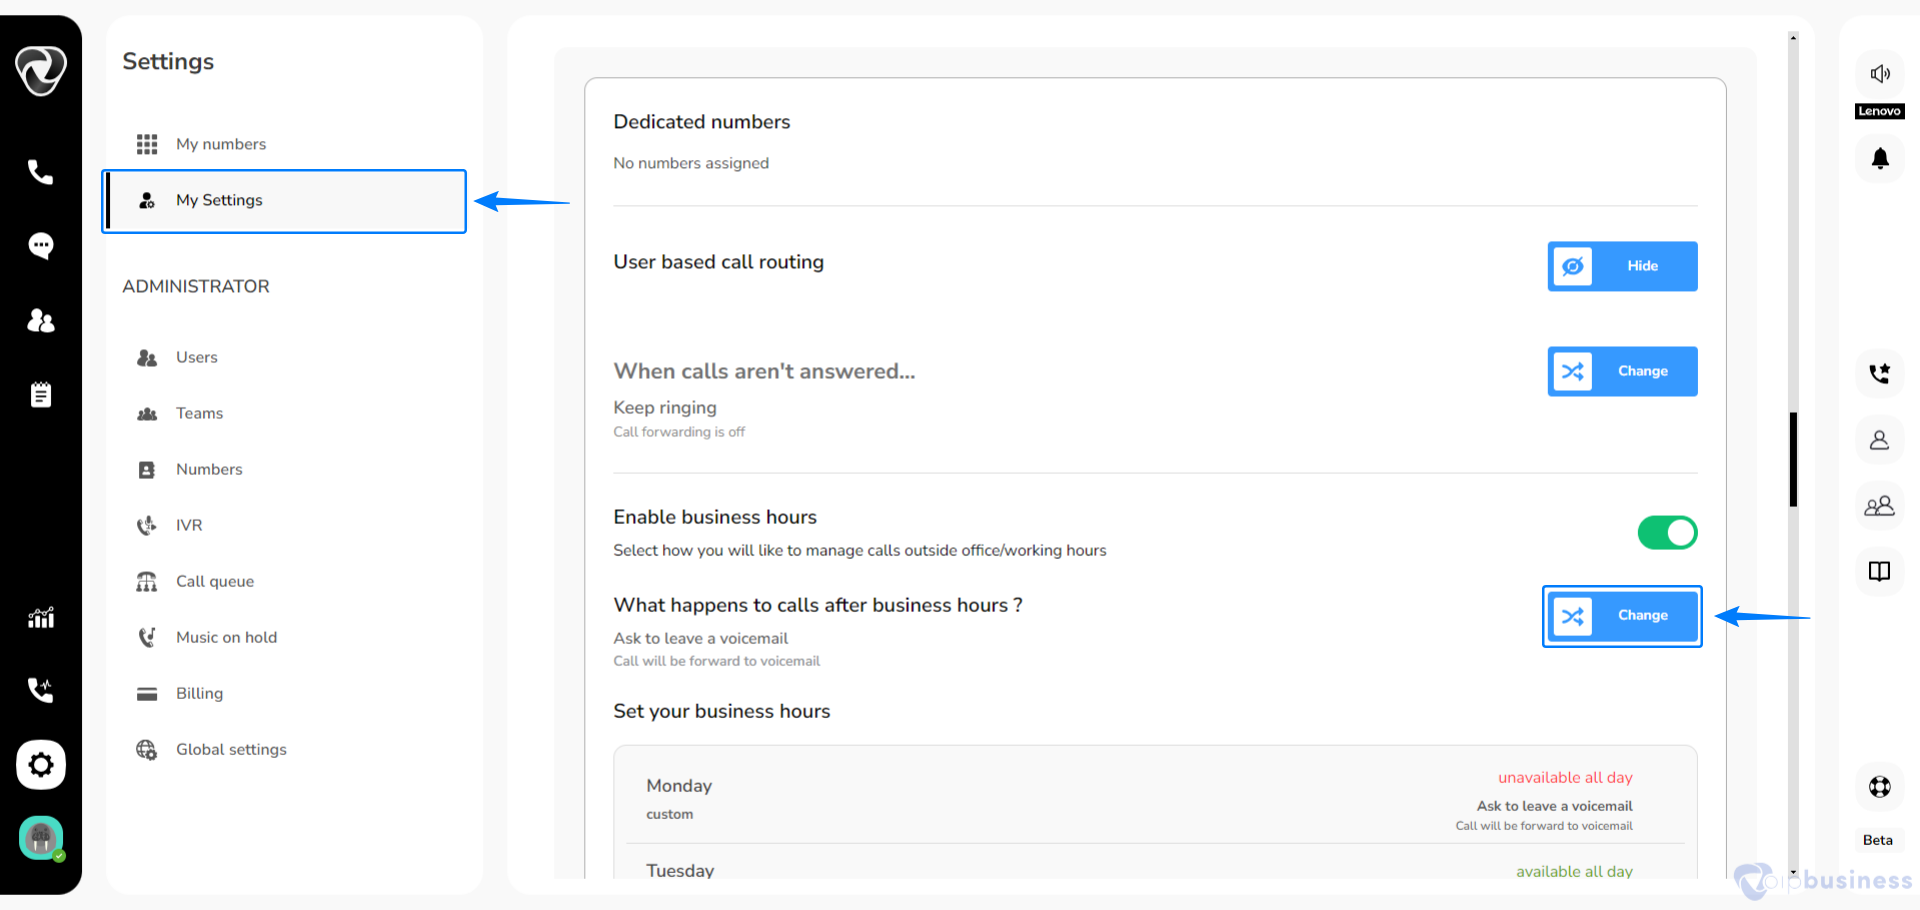
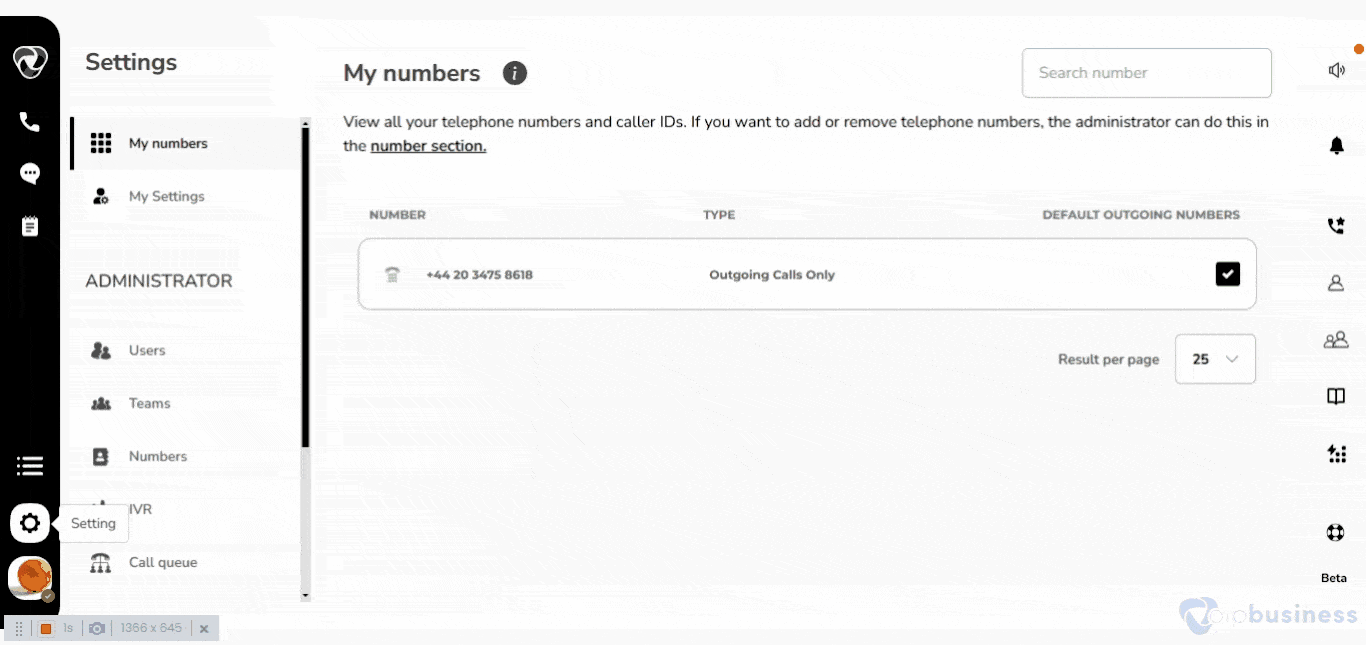
Log in > click "Settings" (gear/cog wheel) > then "My Settings".
Here click on “IVR” to begin configuration.
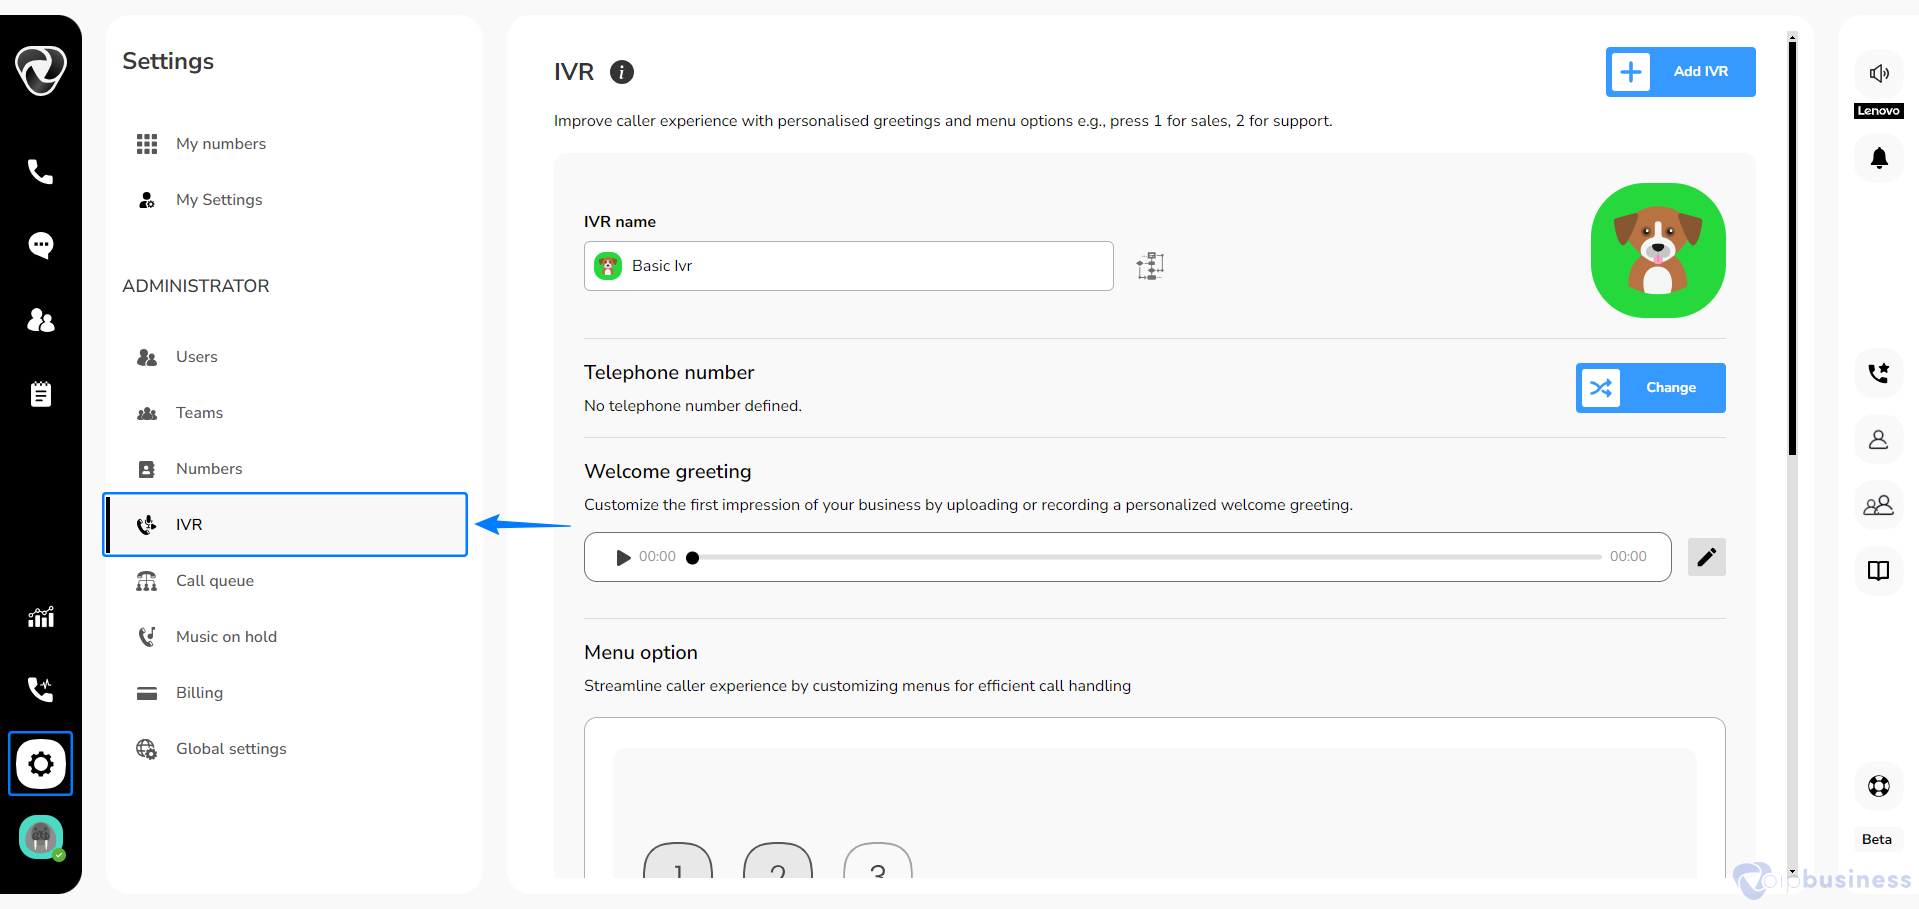
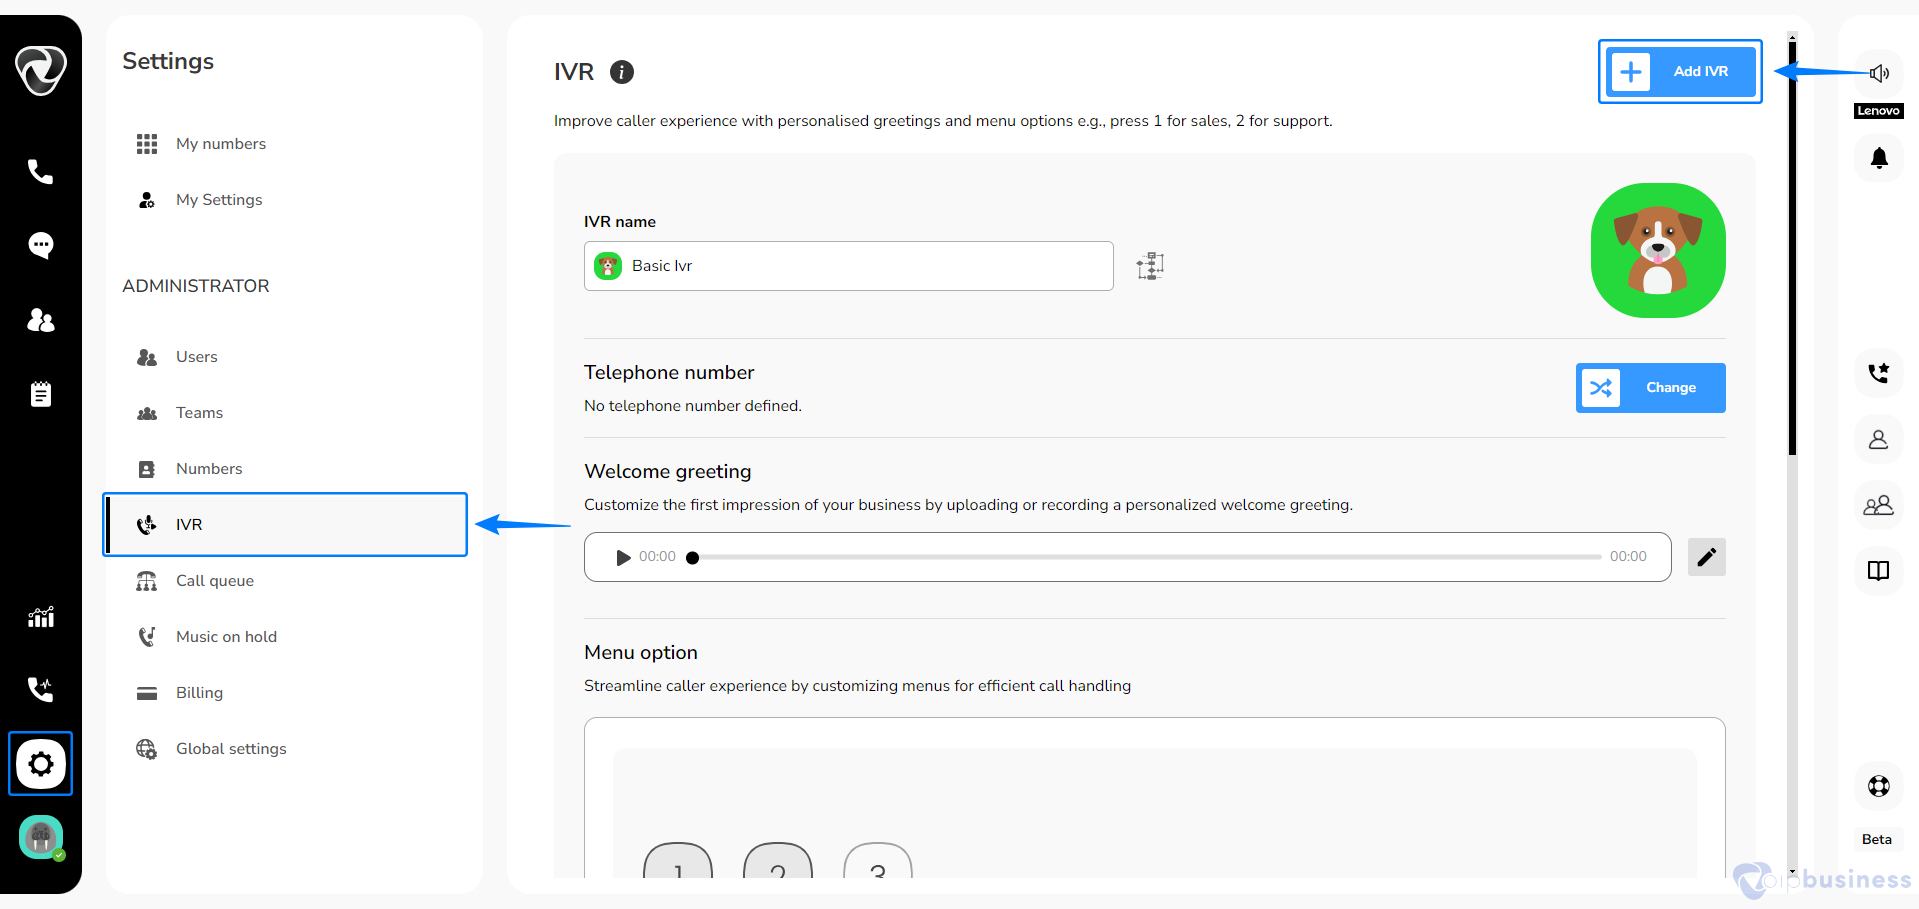
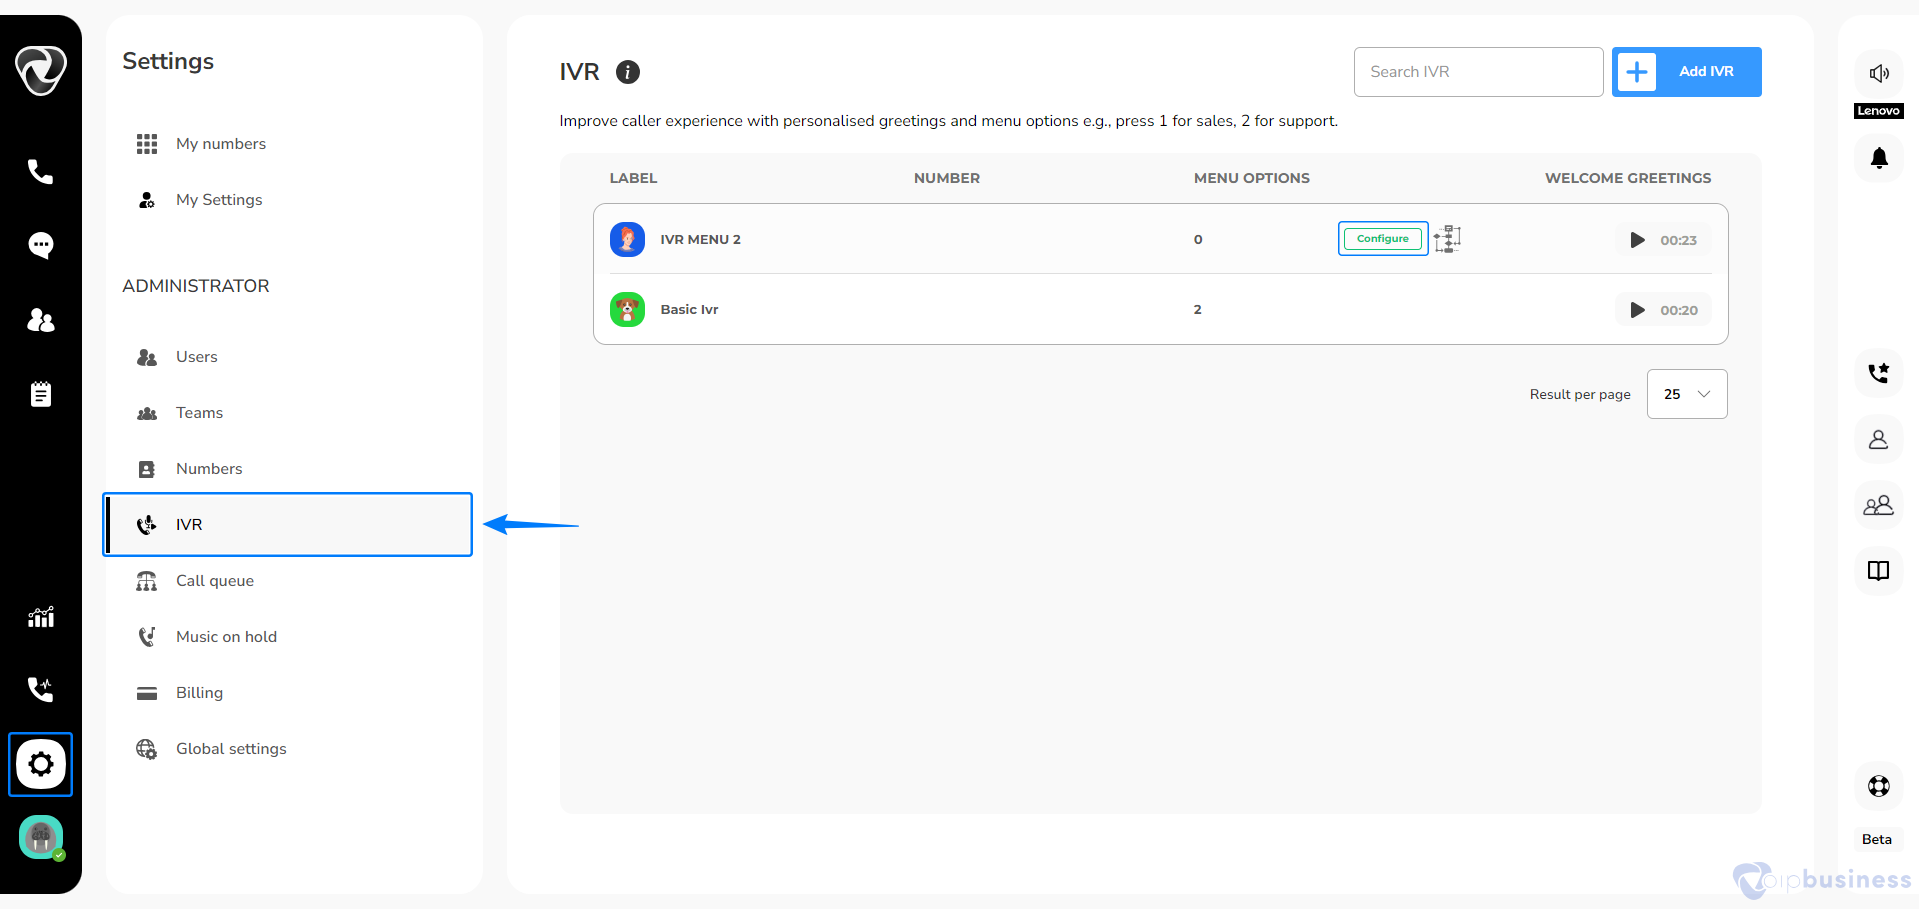
2. Add an IVR
Optimize call flow with an IVR that allows callers to select their desired service or department.
In the Administration settings click “IVR”.
On the “upper right corner” of your screen click “+Add IVR”.
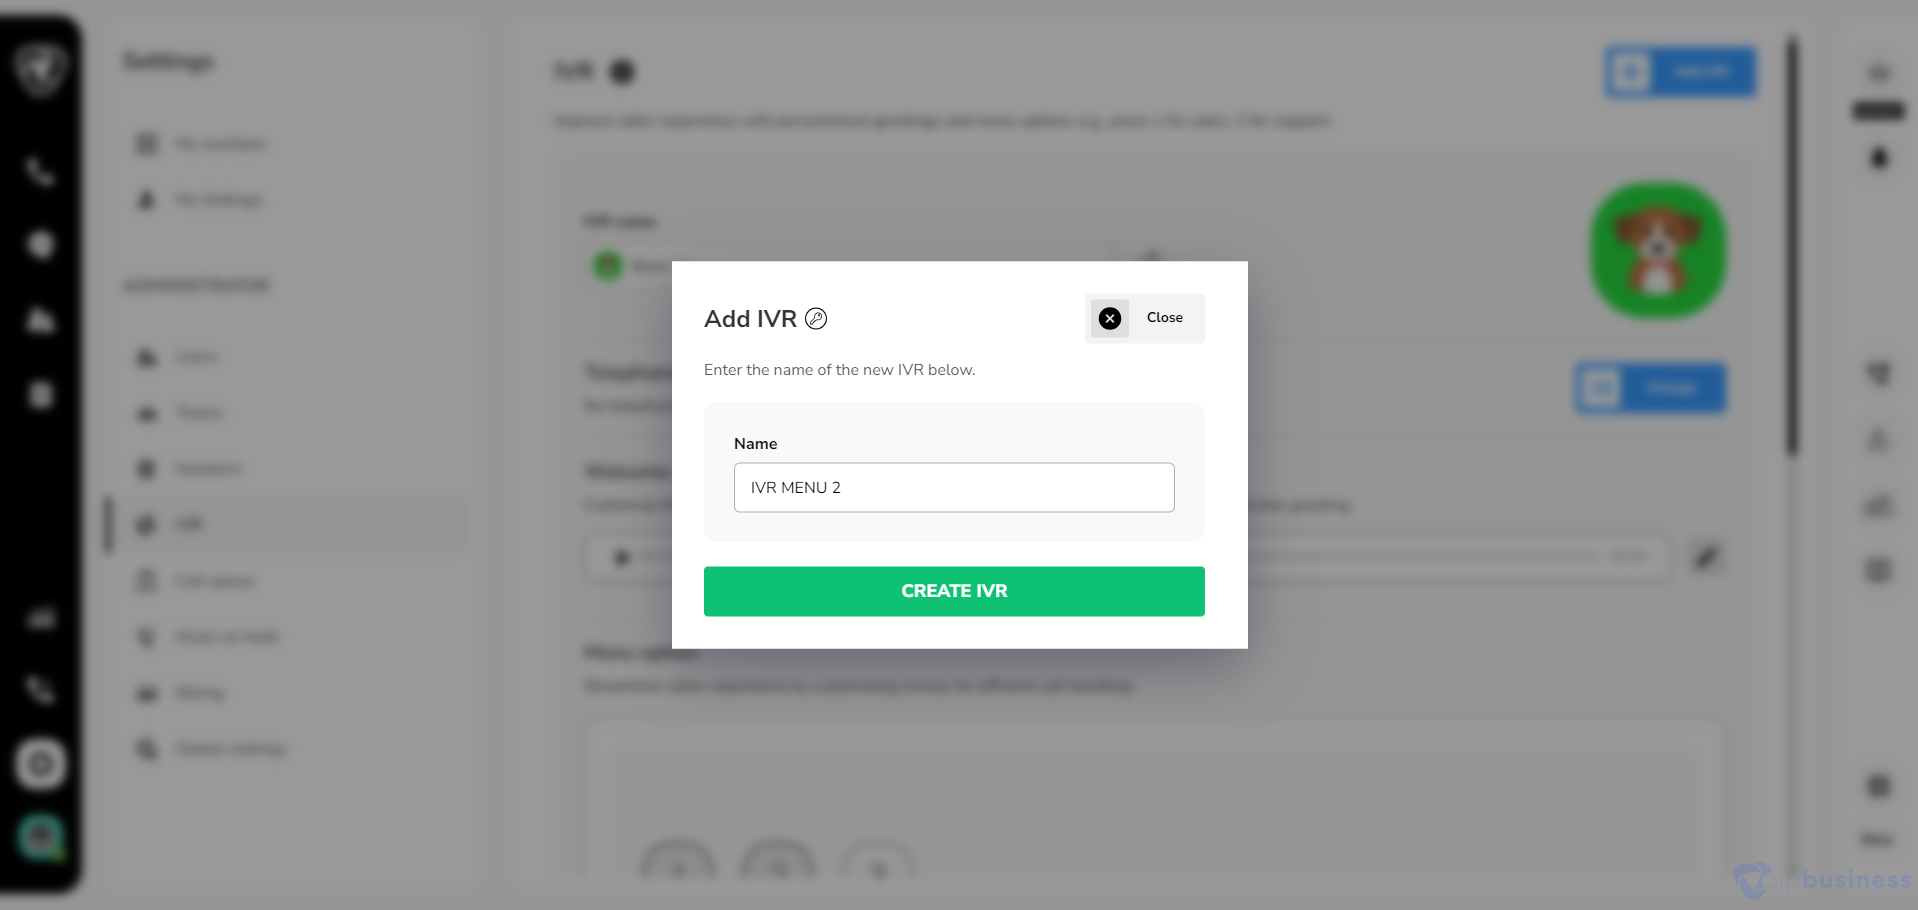
Enter the IVR name and Click “Create IVR”.
Example:
If you want to reduce wait times and ensure callers reach the right department quickly, set up an IVR (Interactive Voice Response) by following the steps below:
Navigate to Administration Settings and click “IVR.”
In the upper right corner, click “+Add IVR.”
Then enter a name for the IVR, such as “Support Line IVR”, and click “Create IVR.”
Now, customers calling your company are greeted with an automated menu (e.g., “Press 1 for Sales, Press 2 for Support”), and are directed to the appropriate team without unnecessary transfers.
3. Redirect Calls To IVR
Redirect calls to an IVR to automate call routing and make sure callers reach the right department or service efficiently.
Go to“My Settings.”
Scroll to “User-Based Call Routing” and click “Change.”
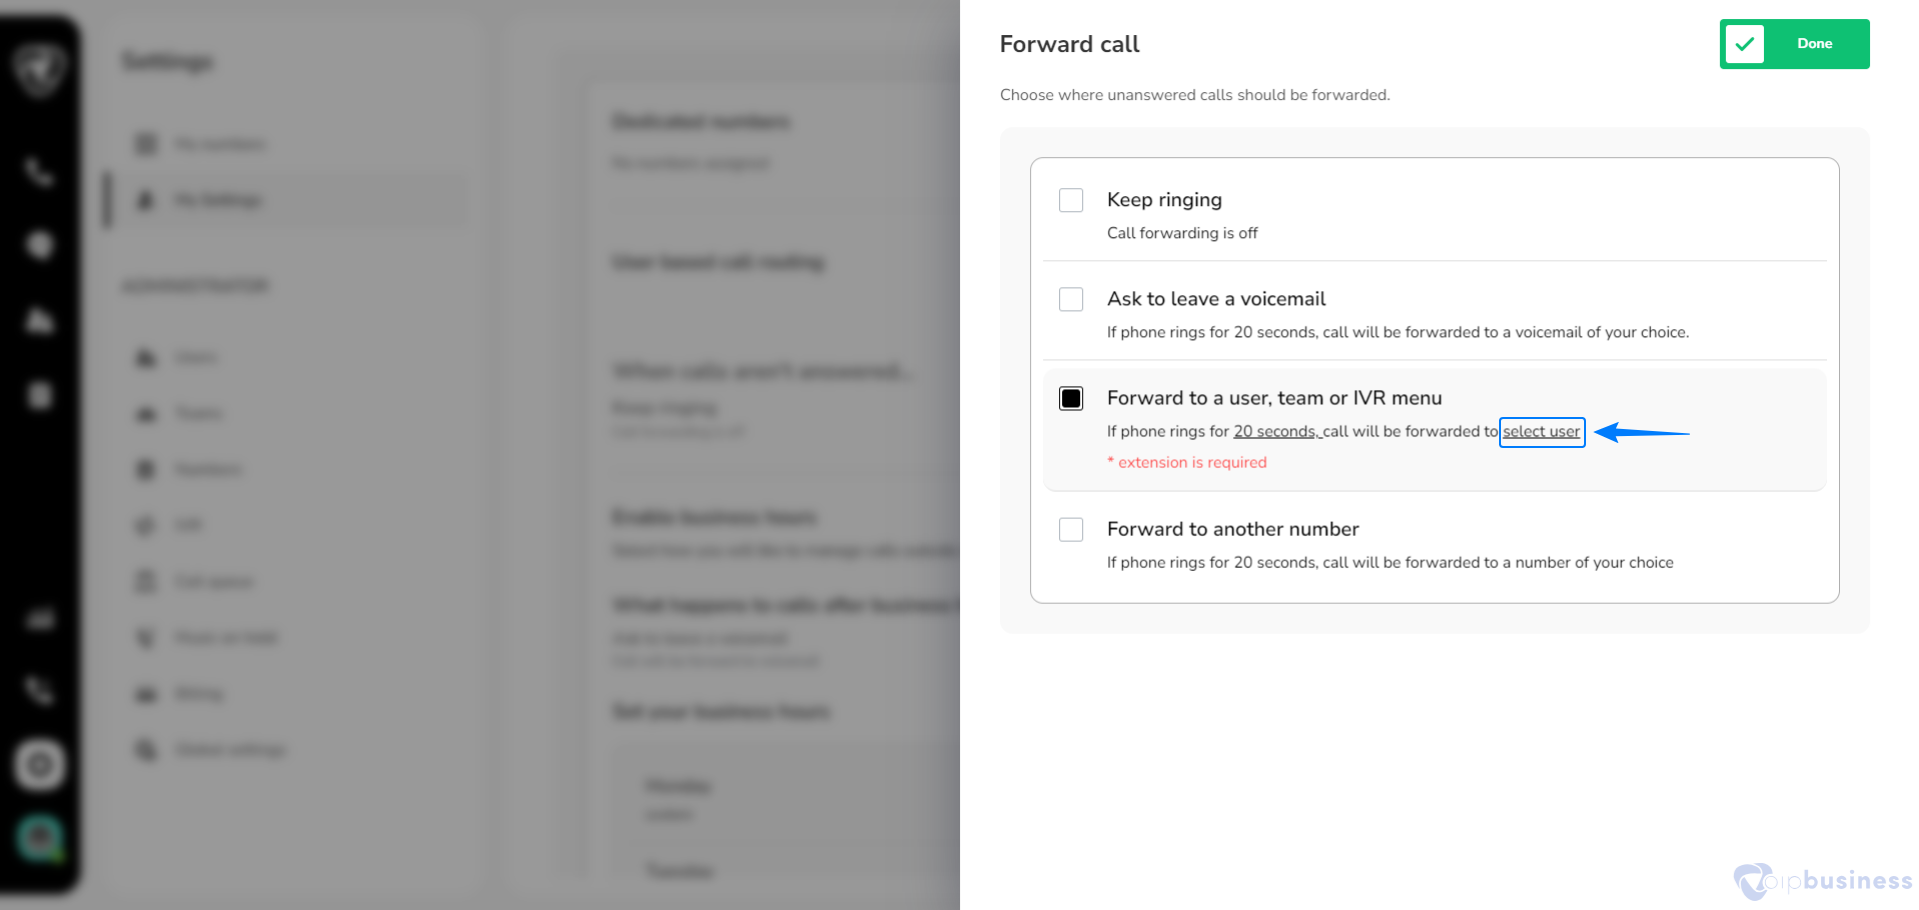
Choose “Forward to a user, team, or IVR menu”.
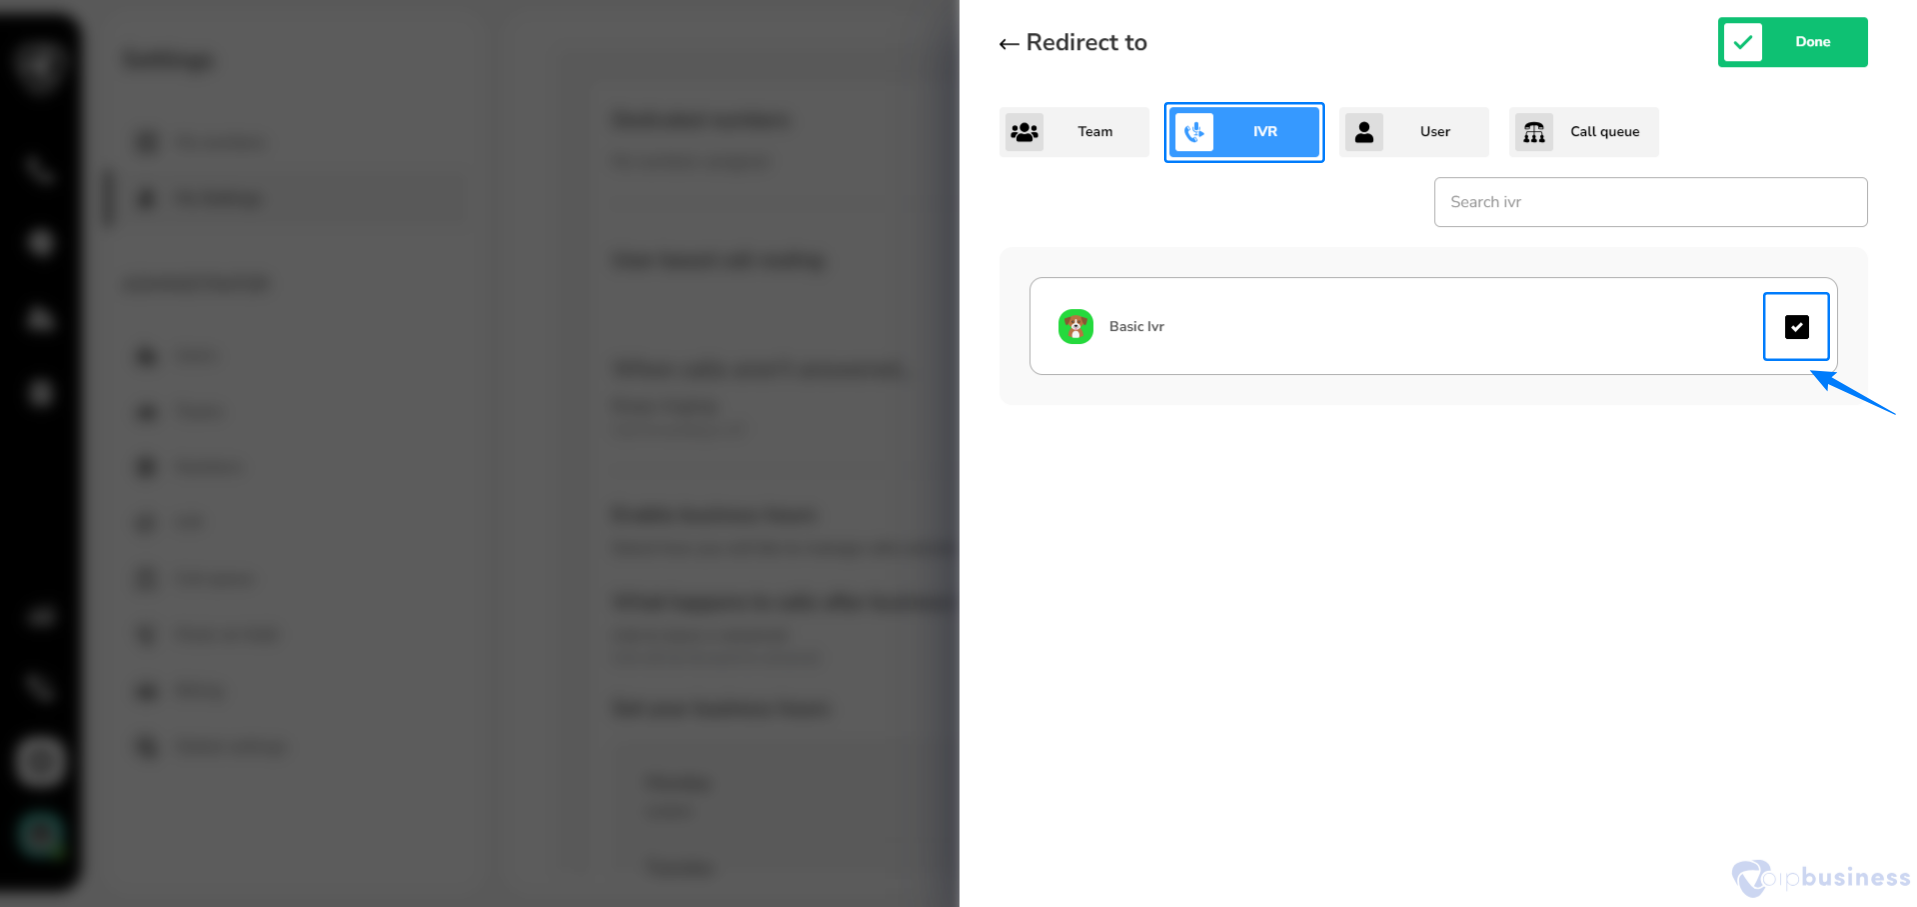
Click “IVR”
Select the desired IVR for call forwarding.
Now your calls will be redirected to IVR.
Example:
intervention. To streamline call handling, you can redirect calls to an IVR menu by following these steps:
Navigate to “My Settings.”
Scroll to “User-Based Call Routing” and click “Change.”
Now select “Forward to a user, team, or IVR menu.”
Clicks “IVR” and chooses the desired IVR for call forwarding.
Now, all incoming calls are automatically routed through the IVR, allowing callers to select the appropriate department or service without the need of a receptionist.
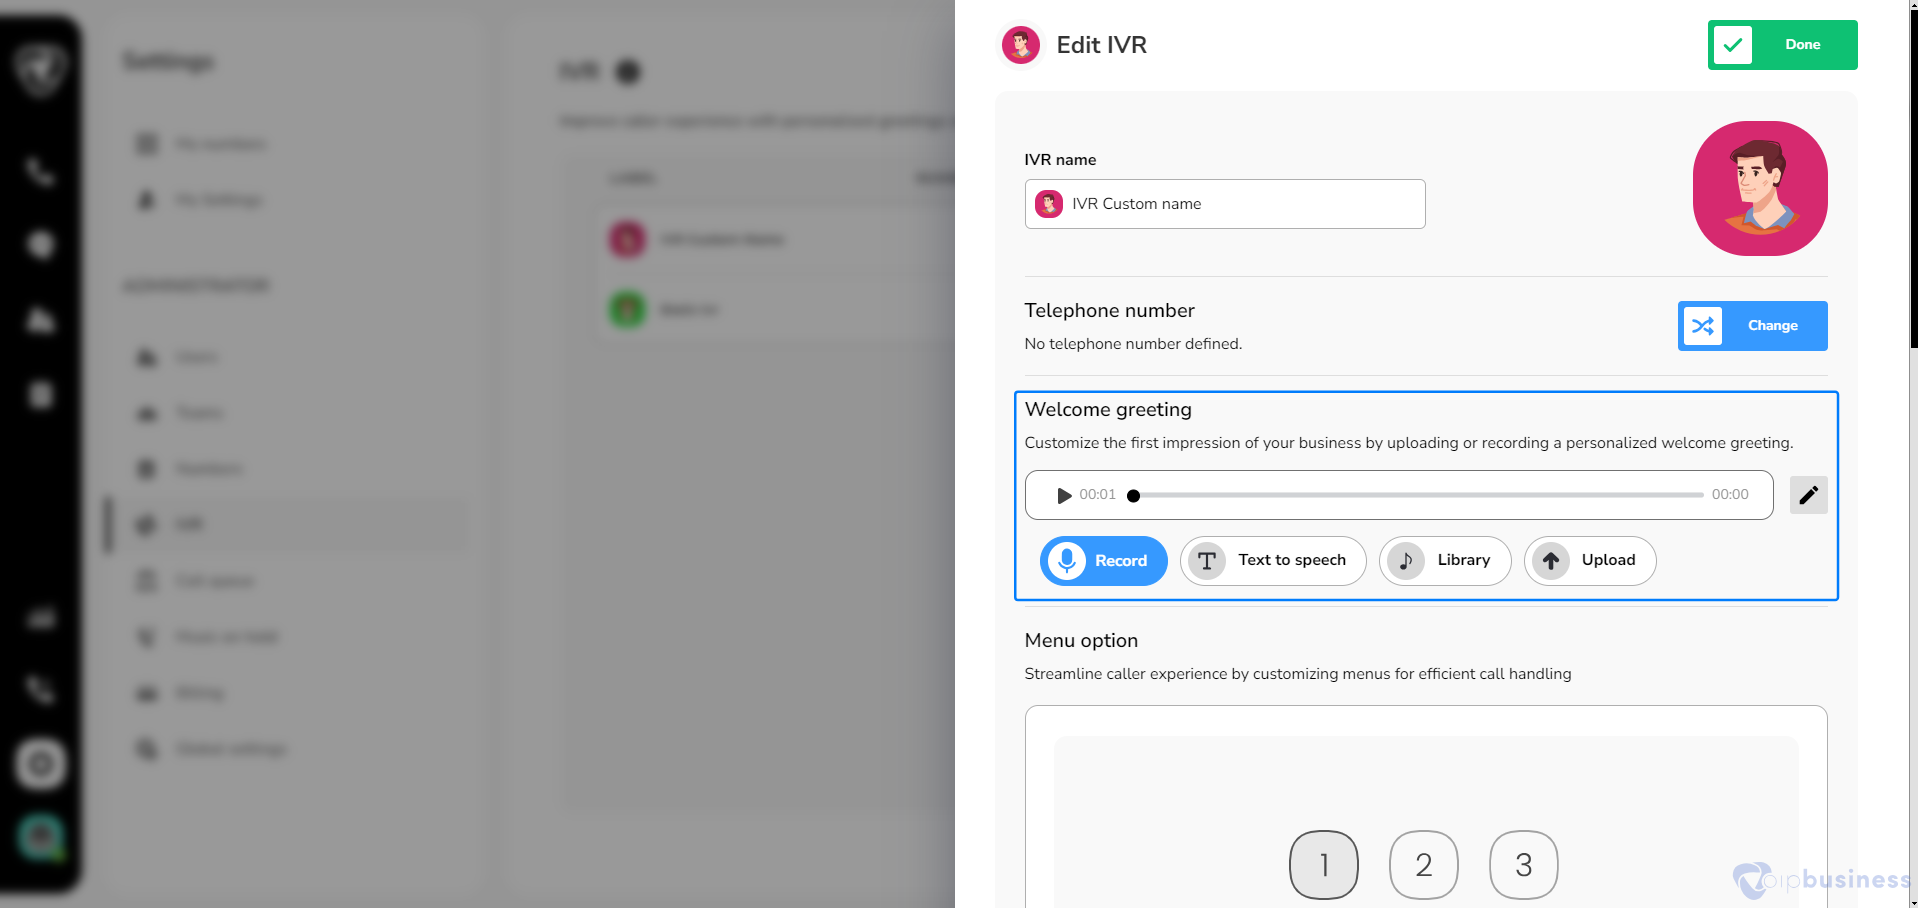
4. Edit IVR
Edit an IVR to update call routing options, menu prompts, or settings for a better caller experience and improved efficiency.
To modify an existing IVR follow the steps below:
In “ Administrator Settings” navigate to “IVR.”
Click on the IVR you want to edit.
Available modifications include:
Change IVR Name
Assign numbers
Update image
Set up a welcome greeting
Add new Menu options
Edit and Delete Menu options
Access advance IVR options
Set Out of Hours
Delete the IVR
5. Welcome Greeting In IVR
Set up welcome greetings in IVR to provide callers with a professional introduction and guide them through menu options.
Go to “Administeration” and navigate to “IVR.”
Select an “IVR” to set welcome greetings.
Click on “Edit Icon” next to “Welcome Greeting”.
New options appear: Choose an option to set “Welcome Greeting”.
Add Your Heading Text Here
Use the default music.
Upload a custom greeting.
Record a new message.
Use text-to-speech.
Select from the sound library.
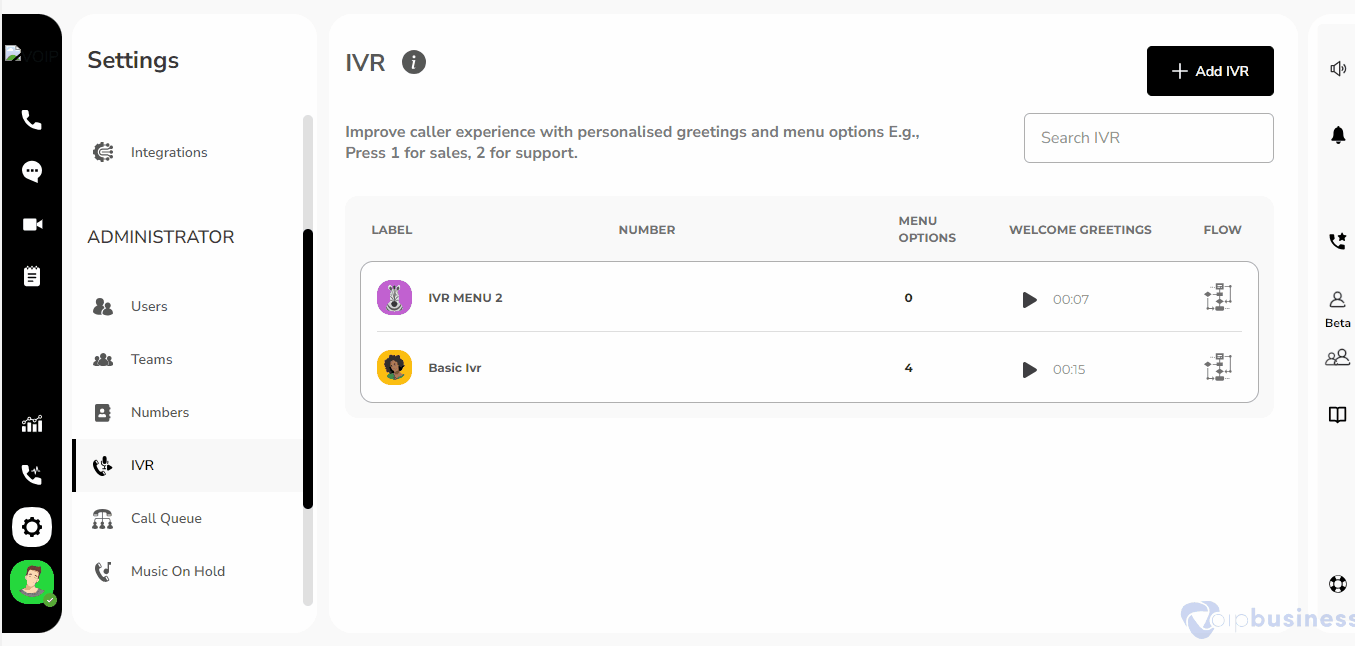
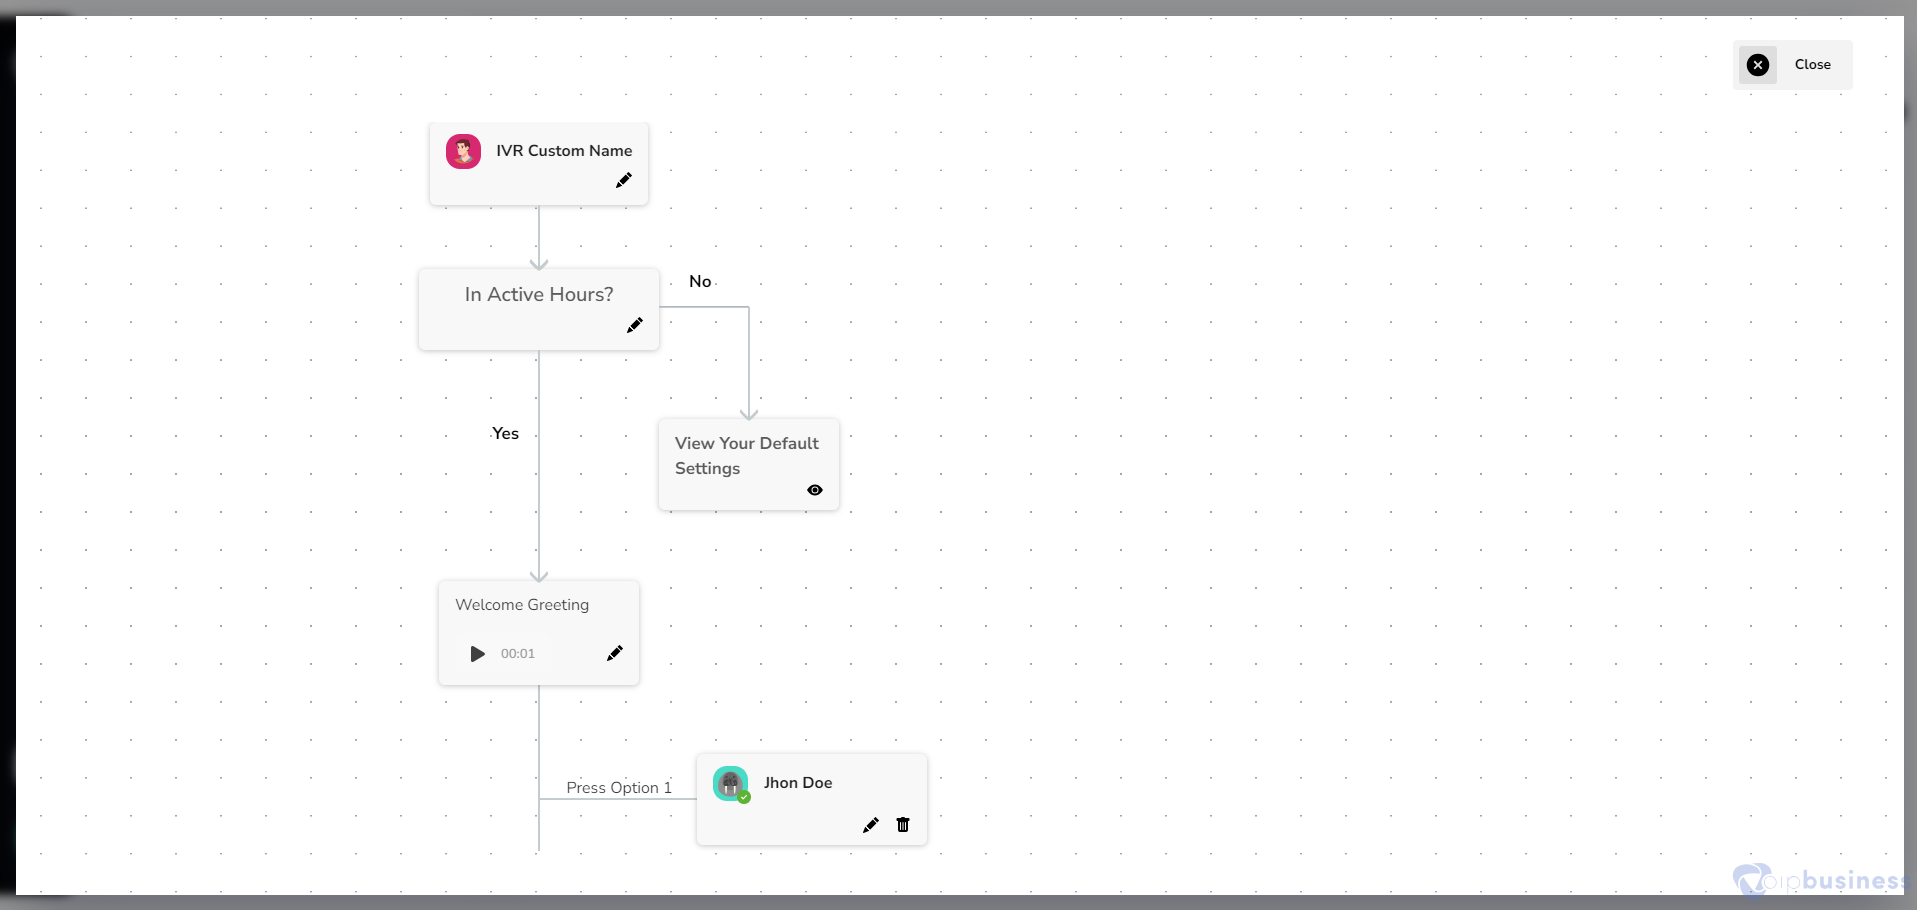
6. View The flow of IVR
For ease you can visually view the flow of IVR menu.
Go to “Settings” and Click “IVR”.
Go to “Settings” and Click “IVR”.
Hover on the “IVR name” for which you want to view flow.
Move to the right and click “‘Flow’” button.
The IVR flow management interface will display a visual layout.
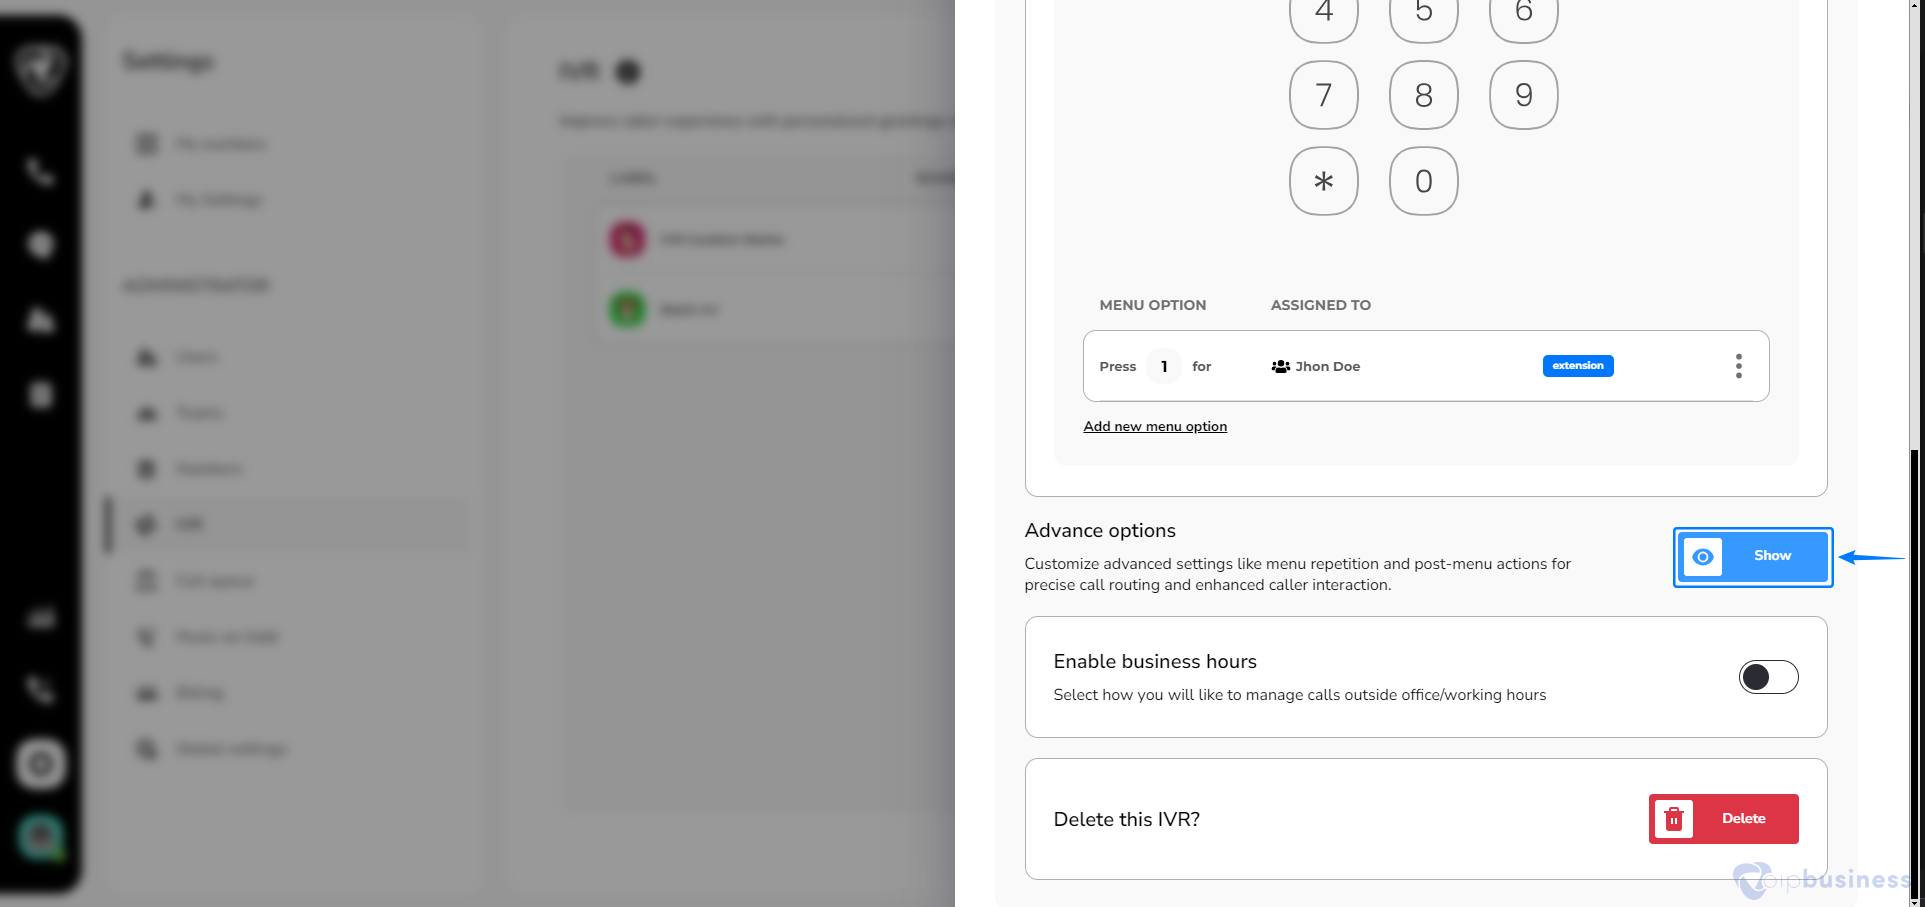
7. Advance Options In IVR
Configure advanced options in IVR to customize call routing, add time-based rules, and enhance caller navigation for a seamless experience.
Go to “Settings” Navigate to “IVR.”
Click on an “IVR name” in the given lists of IVRs.
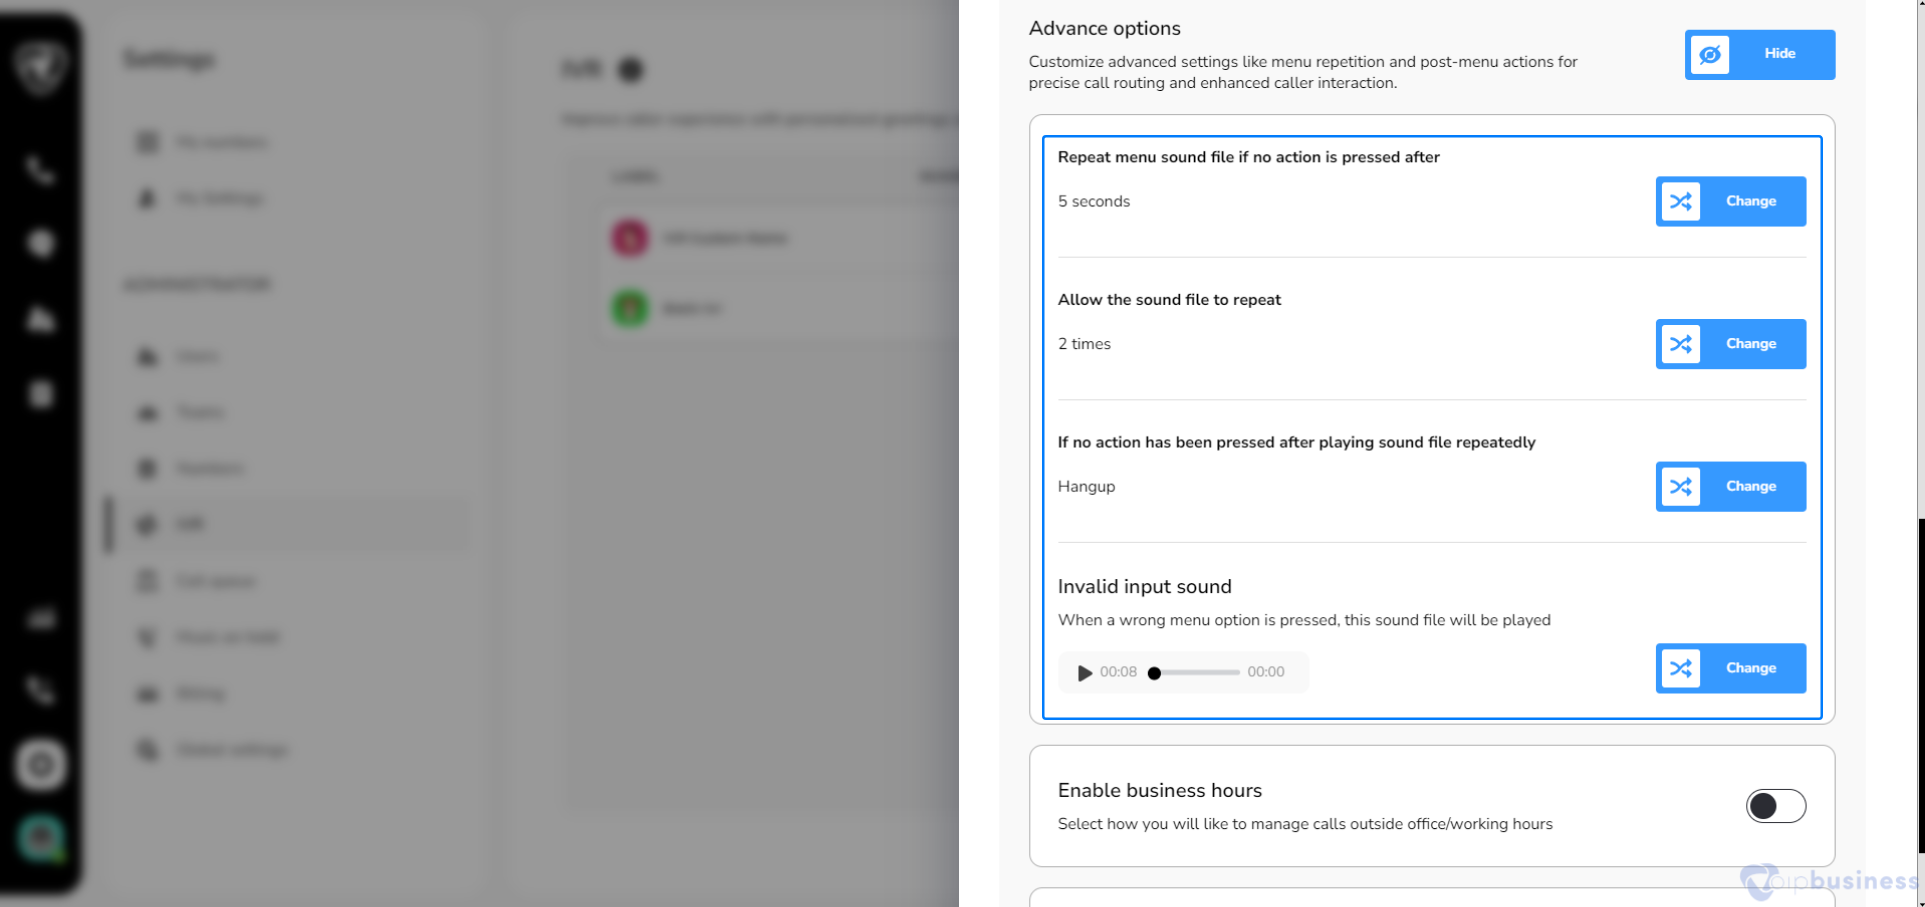
Scroll down to “Advanced Options” and click “Show” to access advanced settings.
Configuring repetition time for a menu
Enable the repeat menu sound file in IVR to replay the menu options if no action is taken, ensuring callers don’t miss their choices.
Click “change” next to “Repeat menu sound file if no action is pressed after”
Select “seconds” after which a menu file is repeated, and click “Done”.
Setting how many times a menu file repeat
Set the number of times a menu file repeats in IVR to ensure callers have multiple opportunities to respond before the call is redirected.
Go to “Advanced options” and click “Show”
Then click “change” next to “Allow the sound file to repeat”
Select the time as per your preferences and click “Done”
Set sound file for invalid input
Set a sound file for invalid input in IVR to notify callers of incorrect selections and ask them to try again.
Go to “Advanced options” and click “Show”
Click “Change” next to “invalid input sound”
Select a “sound file” and click “Done” or click “Add” to add a new sound file.
Choose to “record”, “Text to speech” or “upload”
Enter the “name” > select the “category” and add your music file.
How to deal with calls if no action has been pressed after repeating menus?
Manage your calls seamlessly by choosing what to do with calls if no action has been taken even after repeating menu files.
Go to “Advanced options” and click “Show”
Click “change” next to “If no action has been pressed after playing sound file repeatedly”
Select an option from "Forward to another IVR”, “Play message and forward caller to User, Teams, IVR Or Queue” or “Hangup” and click “Done”
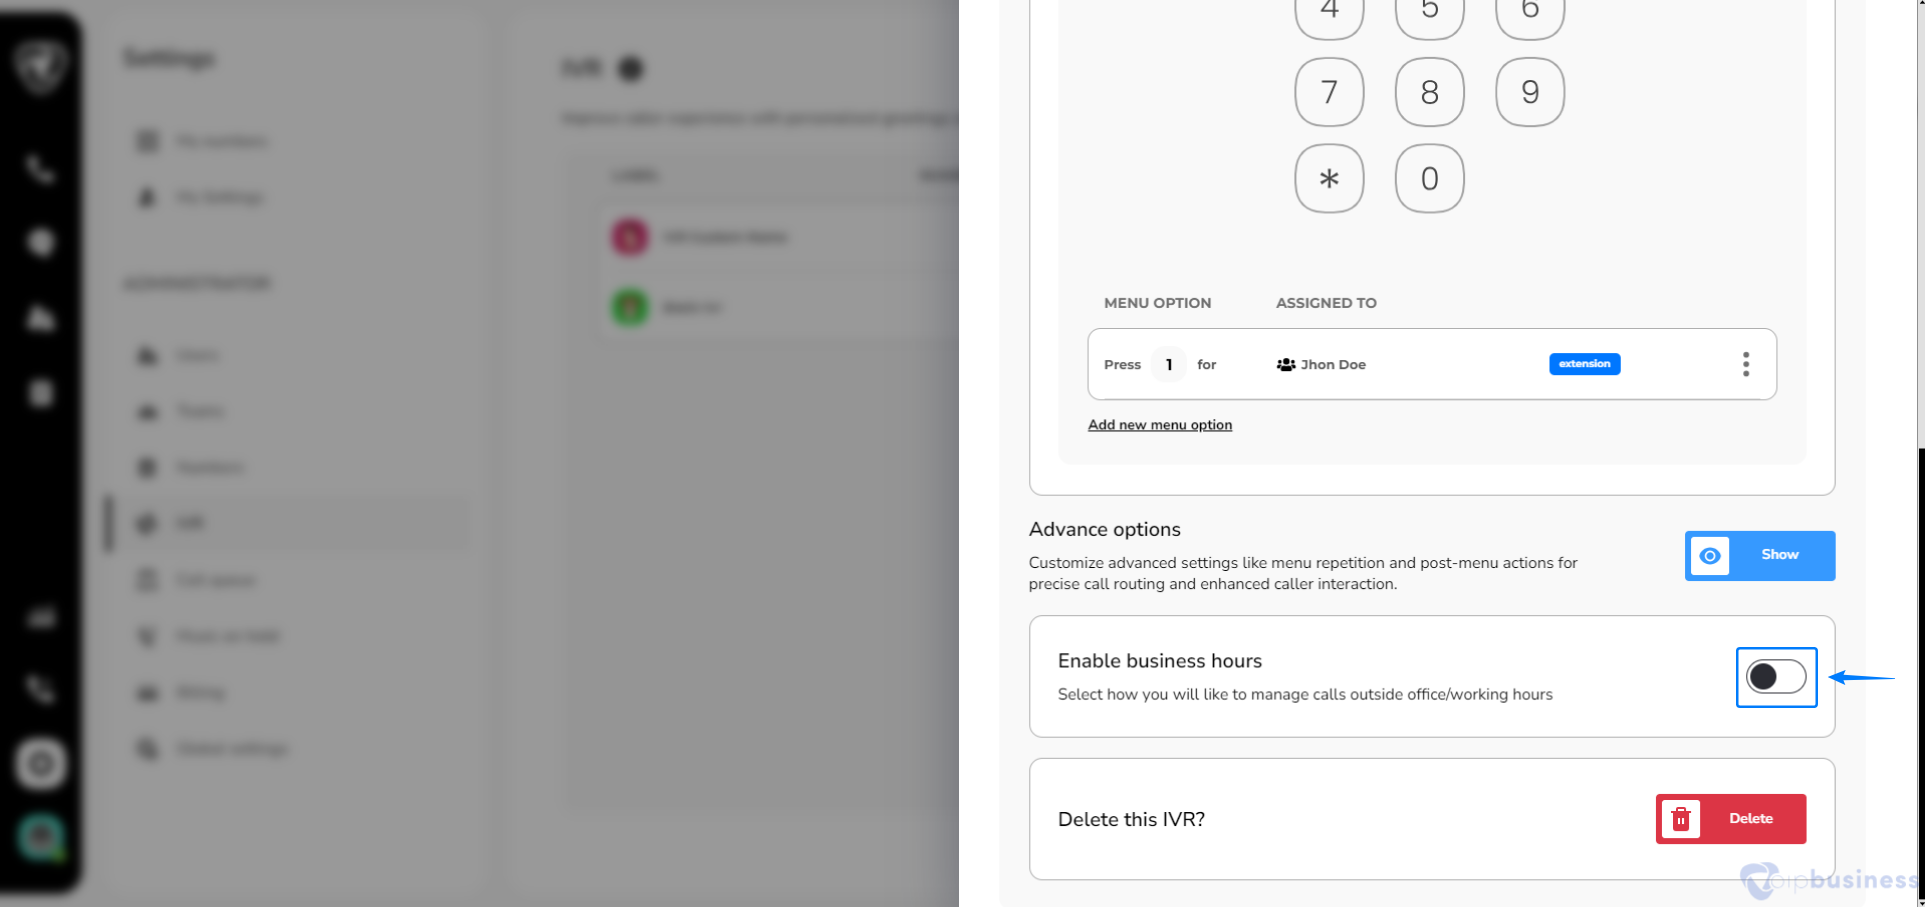
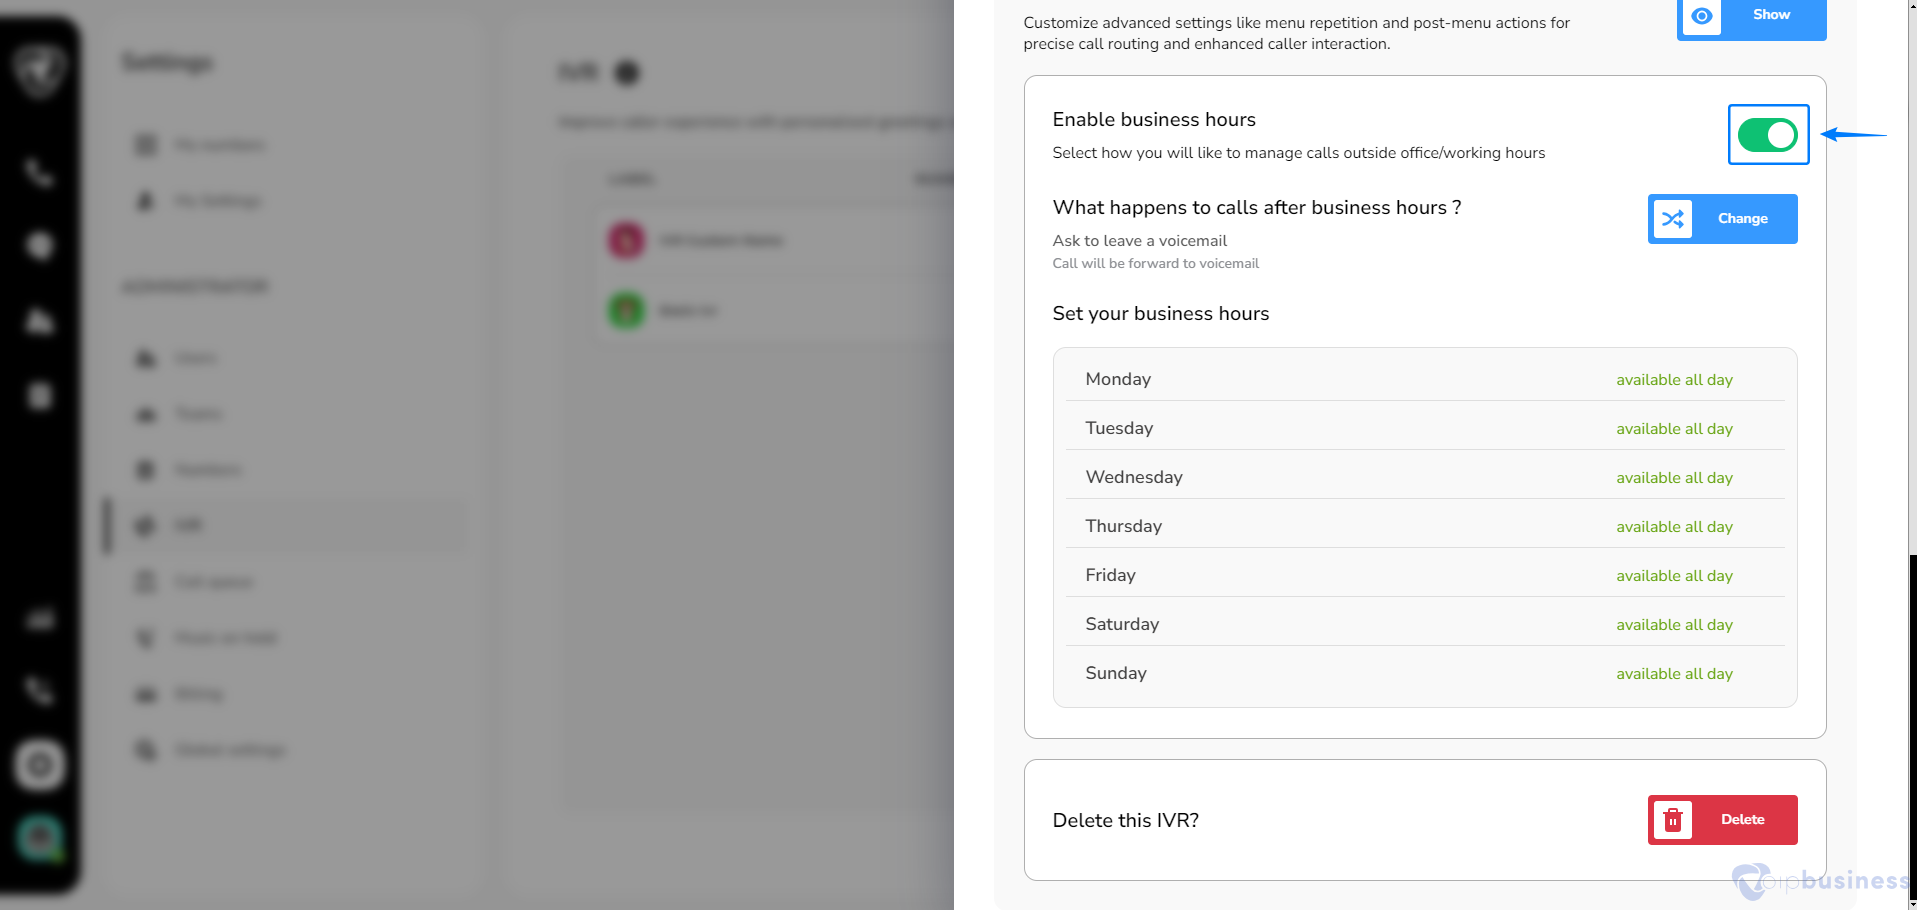
8. Set Business Hours
Set business hours for voicemail to ensure calls are directed appropriately outside working hours and allow callers to leave a message when your team is unavailable.
Go to “Settings.”
Select the IVR under “Administrator Settings.”
Navigate to ‘“Business Hours.’”
Scroll down and set "Enable business hours" to "on" (button to right).
Here set up weekly hours and select a desirable way to transfer incoming calls.
Here you can Configure:
Active days
Call forwarding setting
Unanswered call settings
9. How to delete an IVR?
Delete an IVR to remove outdated or unnecessary call menus and streamline your call routing.
Go to “Settings”
Click “IVR” and select an “IVR” that you want to delete.
Scroll down to “Delete this IVR” and click “Delete”
A confirmation pop up appears, click “Yes” to delete IVR.