Home > Call Queue > VoIP Business-Call Queue(Advance Options)
More results...
Contents
Call Queue-Advance Options
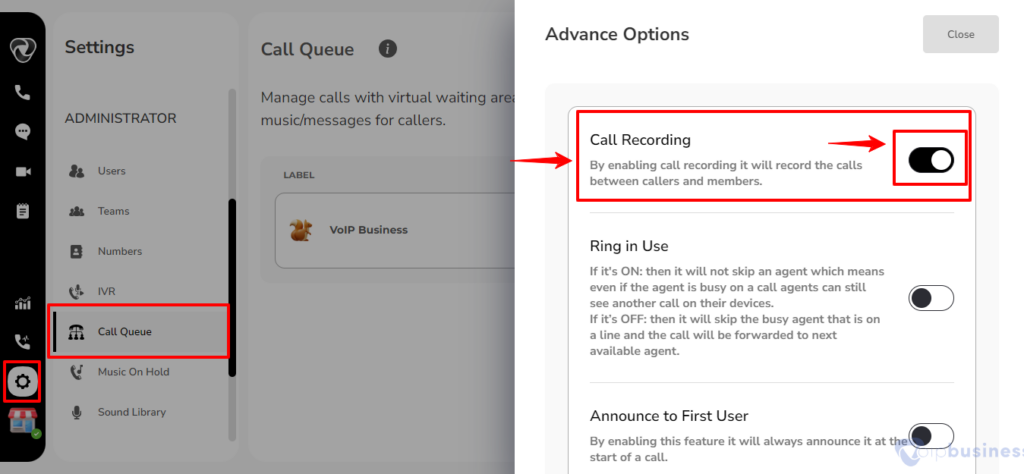
Call Recording
The call recording feature is crucial for tracking and improving how agents handle calls in call queue.
This feature allows easy recording of conversations between callers and team members, making it simple to track of important details. By recording calls, businesses can check how well agents are doing their job, make improvements, and ensure every customer’s call is handled professionally.
Help you in evaluating the call agent’s performance.
How To Set Call Recording?
Start the process by logging into your account.
Click on the “setting” icon in the left-bottom sidebar.
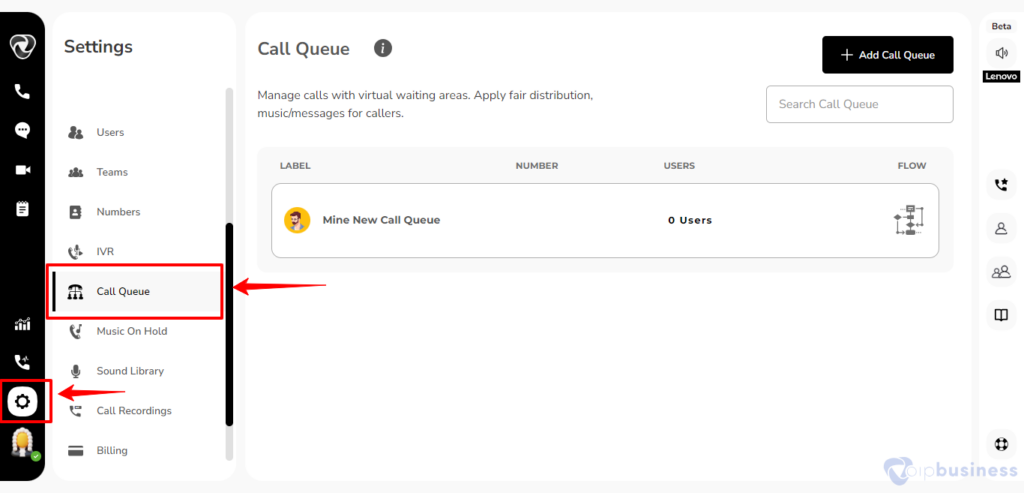
Go to the ‘Call queue’ feature within the ‘Administrator Settings’.
Choose the desired call queue.
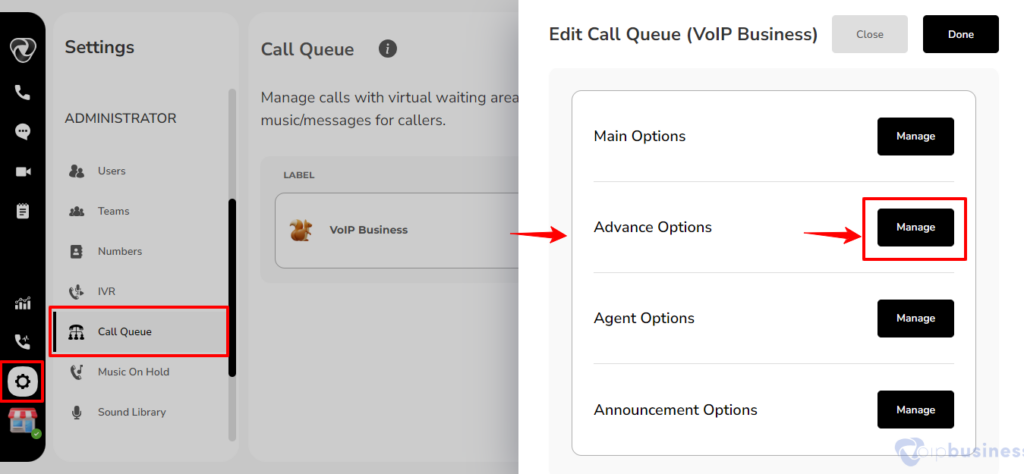
Scroll down to access agent and timing options and click on “configure” button.
Enable call recording from the available options.
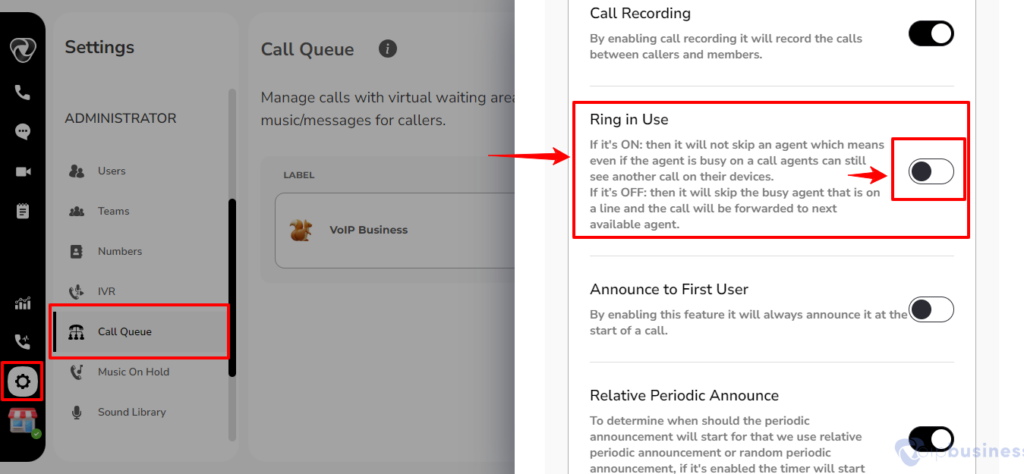
Ring in Use
Ring In Use:
If it’s ON: then it will not skip an agent, which means even if the agent is busy on a call, agents can still see another call on their devices.
If it’s OFF: it will skip the busy agent on a line, and the call will be forwarded to the next available agent.
How To Set The Ring In Use?
Access your account by logging in.
Locate the ‘Settings’ icon positioned in the left-bottom sidebar.
Within the ‘Administrator Settings’ menu, navigate to the ‘Call Queue’ feature.
Once in the ‘Call Queues’ menu select the desired queue .
Scroll down to access agent and timing options and click on “configure” button.
Scroll down and enable Ring in Use.
How To Enable The Announcement To The First User?
Announce To The First User
This feature tells the caller their position in the queue or how long they might have to wait. If this option is off, the system will just say, “Thank you for your patience.”
It will always announce this feature by enabling it at the start of a call.
Follow These Steps For Enabling Announcement For The First User:
To start, access your account by logging in.
Subsequently, locate the ‘Settings’ icon positioned in the left-bottom sidebar.
Within the ‘Administrator Settings’ menu, navigate to the ‘Call Queue’ feature by selecting the designated button.
Once in the ‘Call Queues’ menu, select the desired queue by making a selection from the presented table.
Scroll down to access Announcement options and click on “configure” button.
Scroll down and enable Announcement for the First User.
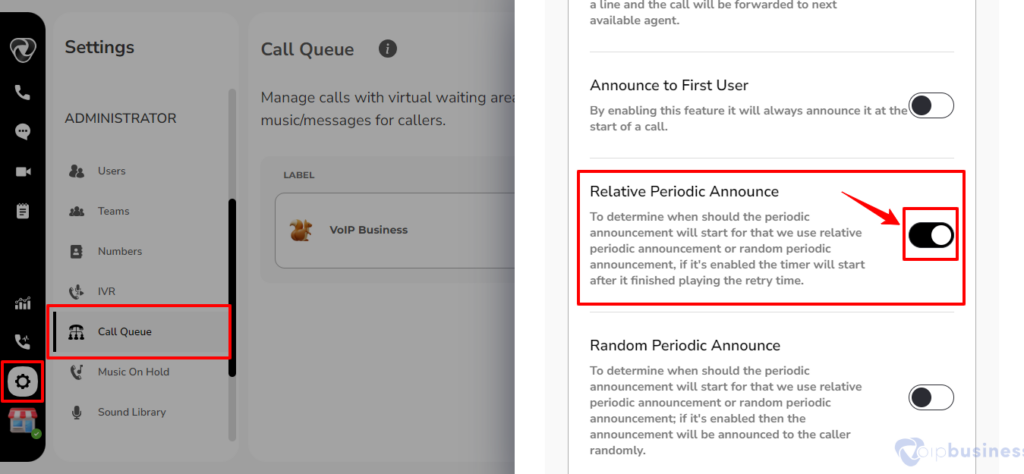
How To Enable The Relative Periodic Announcement?
Relative Periodic Announce
This feature controls when periodic announcements will start during a call. The announcement timer begins after the set retry time has finished.
This retry time is a designated interval that follows the conclusion of the periodic announcement, ensuring a consistent timing pattern.
To enable relative periodic announcement go to announcement options of your selected call queue and toggle the button present besides relative periodic announcement.
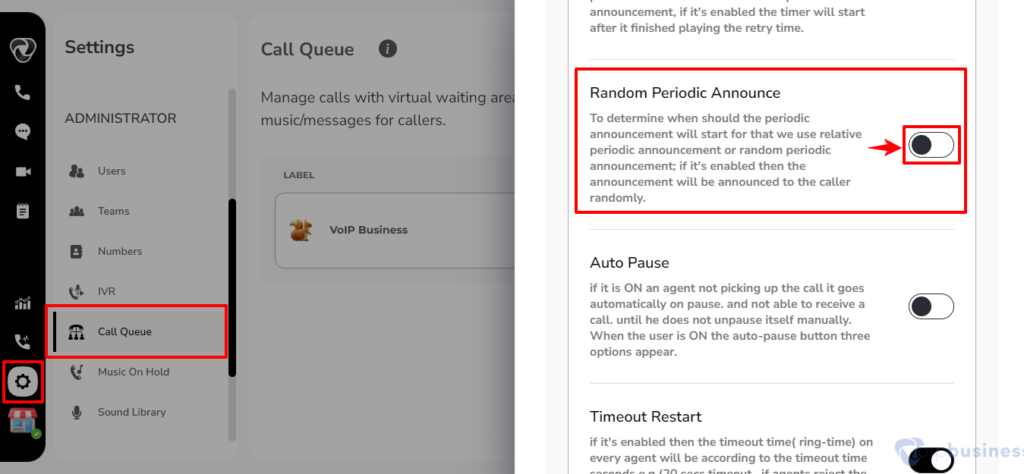
How To Enable The Random Periodic Announcement?
Random Periodic Announce
This feature makes the system announce things to the caller at random times during a call. It adds an element of unpredictability, making the experience more dynamic.
To enable random periodic announcement go to the ‘Announcement Options’ of your selected call queue.
Toggle the button next to ‘Relative Periodic Announcement’ to turn it on.
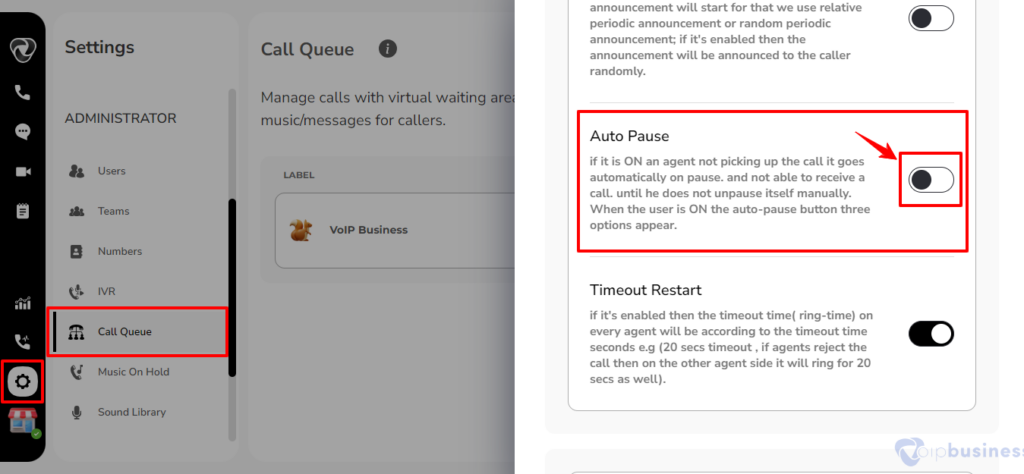
How To Enable Auto Pause?
Auto Pause
When auto-pause is enabled, if an agent misses a call, the system automatically pauses their status so they won’t receive more calls until they manually un-pause themselves. It helps make sure calls are not left unanswered.
Go to the ‘Call Queue’ from the ‘Administrator Settings’.
Select a queue.
Go to ‘Agent and Timing Options’ and click “Configure”.
Scroll down and enable ‘Auto Pause’.
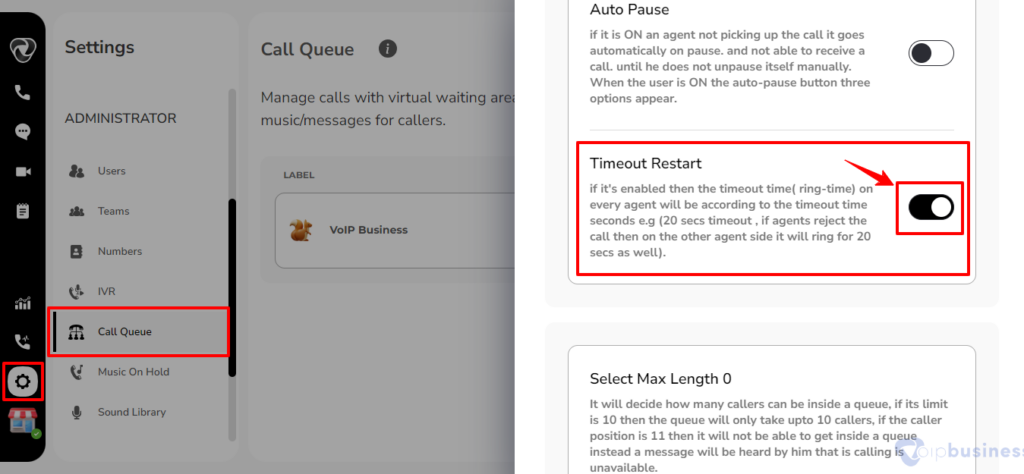
How To Set Timeout Restart?
Timeout Restart
How To Set The Max Length?
When enabled, this feature ensures that the ring time for each agent is the same, such as 20 seconds. If an agent doesn’t answer, the system will give the next agent the same amount of ring time. This keeps the process consistent for all agents.
How to Set Timeout Restart:
Go to the ‘Call Queue’ from the ‘Administrator Settings’.
Select a queue.
Go to ‘Agent and Timing Options’ and click “Configure”.
Scroll down and enable ‘Ring Timeout Restart’.
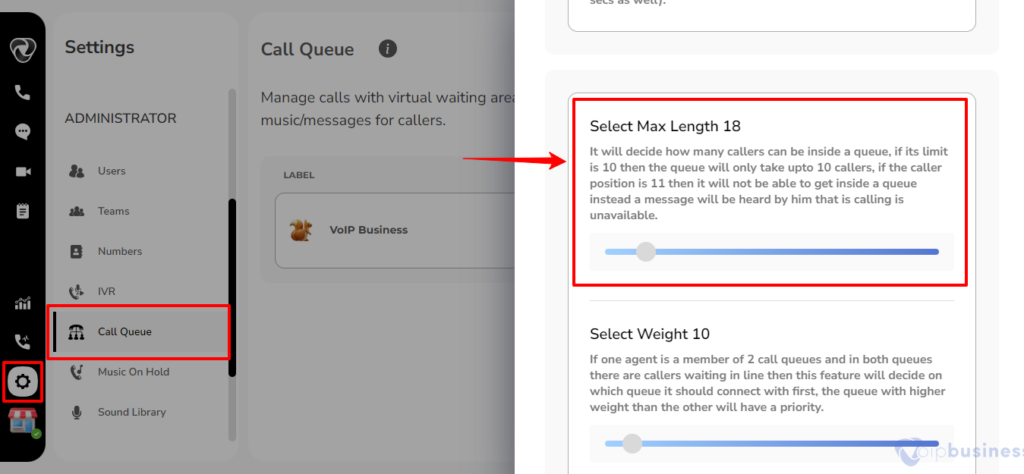
Select Max Length
This feature lets you decide how long a call should ring on an agent’s device before the system takes another action. This helps manage how quickly calls are answered.
Go to call queue from admin settings and select a queue.
Now go to Main options and click configure.
Scroll down to 'Maximum callers' and click change button. Decide callers limit and click done.
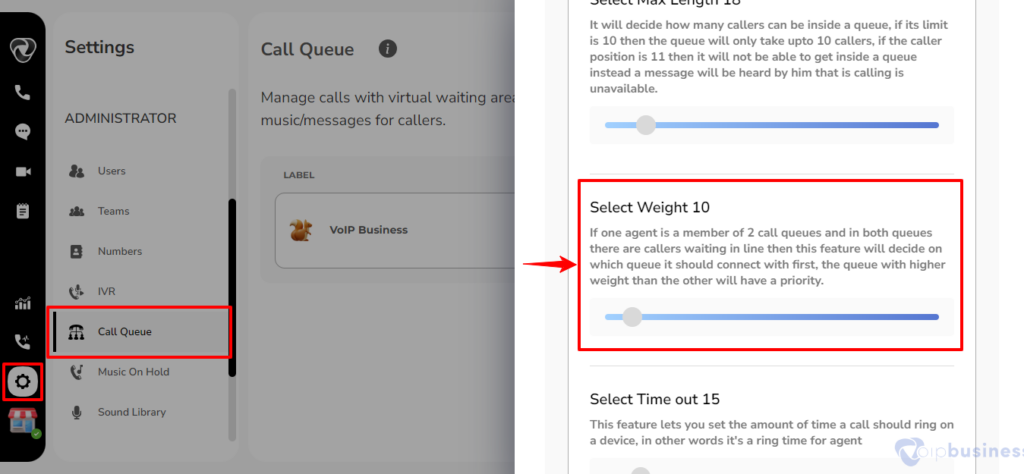
How To Set Weight?
Select Weight
If an agent is part of two queues, the system uses the ‘Weight’ feature to decide which queue takes priority. The queue with the higher weight will connect the agent to waiting callers first. This helps manage call handling effectively.
Go to call queue from admin settings and select a queue.
Now go to Agent and timing options and click configure.
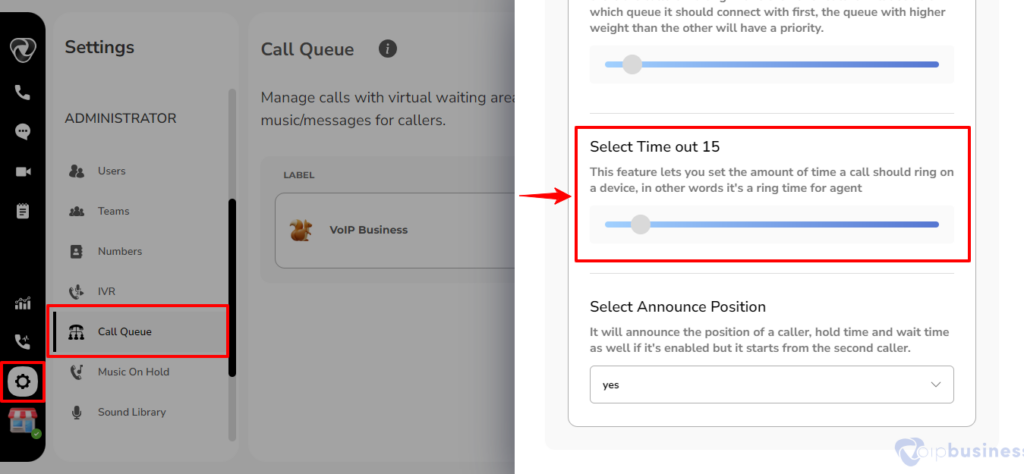
The ring time feature allows administrators to define the duration a call should ring on an agent’s device before alternative actions are taken.
Go to call queue from admin settings and select a queue.
Now go to Agent and timing options and click configure.
Click change button present besides Ring timeout. Select number of seconds and click done.
Announce Position
Announce Position:
It will announce the caller’s position, hold time and wait time if enabled, but it starts from the second caller.
It Also Depends On The Following Options:
Yes: it will announce the position of a caller to every caller.
No: if it’s set to no, then no caller position will be announced
Limit: it will only announce the position of callers to them with respect to the limit, e.g. if the limit is 5, then only the first five users will be able to hear their position.
More: it will announce the position of callers to them with respect to the limit, but it also tells callers who exceed the limit that there are currently a number of callers in the queue.
positions will be announced by the second caller. If the user selects position as limit or more, then a new feature name position limit can be seen, which works along with those two positions.
How To Set The Announce Position?
Initiate the process by logging into your account.
Click on the “setting” icon which is located at left-bottom sidebar.
Go to the ‘Call queue’ feature within the ‘Administrator Settings’ menu by clicking the designated button.
Navigate to the desired queue by selecting it from the presented table.
Scroll down to access announcement options and click on “Configure” aligned with the respective label.